User-Agent Switcher for Chrome has been updated with new user agents. For those who don’t know about this extension, here’s a quick intro.
User Agent Switcher for Chrome is an evergreen extension developed by Google that allows you to switch between user agents in your browser. It helps you test how your site appears on different browsers, search bot spiders, and crawlers.

While checking the extension on Chrome Web Store, I saw the developer has not published any updates for this extension since 19 January 2021. I contacted Google’s developer to know if they’re working on any update release.

They said they don’t have a timeline for this plugin’s next release. So, I decided to update this extension with the latest settings by myself.
How I updated this extension?
I replaced all the outdated user agents and added new strings, including the new Bingbot, DuckDuckBot and ChatGPT user agents. I would say, the new configuration settings are a significant update to the core functionality of this extension because it is super helpful for anyone to use in coming years.
This is a simple tutorial explaining how to update the extension User-Agent Switcher for Chrome with new user agents.
The extension mentioned in the blog post will work on Chrome browser only. If you want to change the user agent in any other browser, consider visiting this blog post to learn how to do it manually.
User Agent Switcher? Is it needed?
The user agent switcher extension is inevitable if you are a developer or an SEO Consultant who is responsible for the website’s performance. This extension allows you to quickly toggle the user agent to any type, which helps you to see how your website will look when visiting as a different user type.
When you toggle the extension, the browser will send a different user string in the background, which lets your browser serve the content for that particular agent.
How to Update User-Agent Switcher With the Latest Settings?
As you’re here to update the extension with the latest settings, I’m assuming you’ve already installed it on your browser. If not, follow this guide to learn how to install this extension.
Once you downloaded the extension,
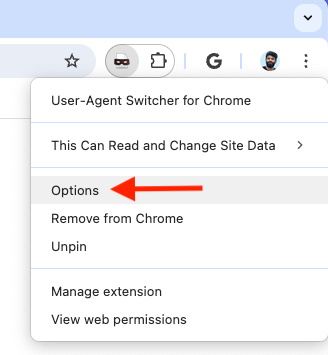
- Right-click on extension icon and select “Options.”
2. Delete all the existing user agents by clicking the Trash can button.
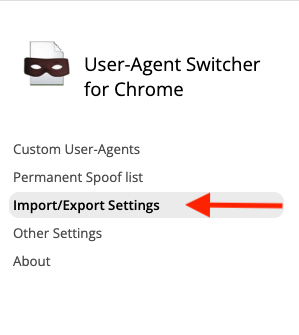
3. Select “Import/Export Settings” from the left sidebar.
4. Click on “Choose file” and upload this JSON file.
That’s it! You’ve updated the extension with new user agent strings. Click on the “Custom User-Agents” to see the updated entries.
How to check user agents are changing properly?
To validate the authenticity of this extension, follow these steps:
- Visit the website WhatIsMyBrowser
- Click on the extension and select the user agent you want to access a webpage as.
- The website will be refreshed automatically with the new user strings applied and it will display the new user agent name.
That’s how you can verify whether the website is able to detect the new user agent or not.

Oh, that’s the end of this post. I’m glad you’ve read it till the end. 🙂
Feel free to let me know if anything breaks in the future!
Last Updated on August 9, 2024 by Ujesh
10 responses to “User Agent Switcher for Chrome – New User Agents Updated”
Gracias, works great. The future is maybe version with brave, duckduckgo.
-ciao
Thank you for your suggestions. The extension will work on brave too. I’ll consider adding DuckDuck Bot user agents on future update.
Hi there. I’ve added support for DuckDuckBot user agent. Feel free to replace old file with the new one.
Really good job, Thanks indeed
Glad you like it!
Brave Doesnt show up??
According to the user agent article by Brave, it does generate its own user agent strings, but it sets nonessential data elements to more general values. It claims the browser is Chrome instead of Brave, and that the browser on your iPhone is Safari instead of Brave. This is to make you appear less unique, and more like any other user. So, even if I add Brave’s user agent, it’ll be showing like Chrome only. Due to this reason, I’m not adding Brave’s user agent to this extension.
I tried to use this on Brave, due to it being banned in few places as browser. Disabled all addons, shield and still didn’t work, my results were:
Your web browser looks like:
Brave on Windows
But it’s announcing that it is:
Chrome 110 on Windows 11
This conflict might be causing other websites to not detect your web browser properly.
According to the user agent article by Brave, it does generate its own user agent strings, but it sets nonessential data elements to more general values. It claims the browser is Chrome instead of Brave, and that the browser on your iPhone is Safari instead of Brave. This is to make you appear less unique, and more like any other user. So, even if I add Brave’s user agent, it’ll be showing like Chrome only. Due to this reason, I’m not adding Brave’s user agent to this extension.
thanks for creating this article. Would there be a way to have the JSON actively updated with the latest/greatest browsers as theres constant updates esp around chrome